
Django and Celery - demo application, part II: expanding.
Introduction
In the last post, we have created “foundations” for this work, including basic project set-up, package installation and virtual environment. If you are familiar with Django, this post may be your starting point. However, if you are not or if you wish to consult the ‘reference’, feel free to take a look at it anytime.
In this post, we will develop our project further to make our task report its progress and render it in the front-end. Since the focus is on integration between Celery and Django, we will keep the task simple, mainly increament a number and watching it change in our html template.
If you already have up and running (e.g. taken from gtihub repo), take a look at the next post that discusses deployment.
Adding Celery
We assume your basic application works and you are able to move between the index and test pages. It is now time to add Celery into the project. We will be using Celery v4.1.0, which is the most recent version at the time of writing of this post.
Installation
Before we get started, we must ensure that we have RabbitMQ installed on our system. It is going to be our message broker of choice to make django and Celery communicate. For other options, see Celery brokers. As for Ubuntu users it often the case that its shipped version is rather outdated, it is recommended that we reinstall it anyway:
sudo apt-get purge rabbitmq-server
sudo apt-get install rabbitmq-server
Next, we can use pip to install the newest Celery:
source ~/celery-env/bin/activate
pip install celery==4.1.0
pip install amqp==2.2.2
pip install django-celery-results==1.0.1
pip install SQLAlchemy==1.1.15
As you see, in addition, we have installed amqp, which is necessary to ensure that the status of Celery’s tasks is stored somewhere. Furthermore, django-celery-results allows to integrate this functionality well into the project. SQLAlchemy will add one more functionality, mainly let us operate on the tasks just as if there were normal django models. We will see more of that later.
Configuration
There exist multiple ways to integrate Celery into a project. Although our application is rather simple, it is considered general good practice to separate all definitions that are related to configuration of Celery from definitions of its tasks. This is especially important once our project grows in size, in which case it makes sense to include separate definitions of Celery’s tasks for each individual application. Therefore, we will include Celery-specific defintions in four places:
hello_celery/hello_celery/celery.py- for storing ‘global’ configurations of Celery.hello_celery/hello_celery/__init__.py- for making django include Celery’s configurations upon start.hello_celery/demo/tasks.py- for including tasks that are specific to demo application.hello_celery/hello_celery/settings.py- for establishing a link to the earlier three.
celery.py
1
2
3
4
5
6
7
8
9
10
11
12
from __future__ import absolute_import, unicode_literals
import os
from celery import Celery

os.environ.setdefault('DJANGO_SETTINGS_MODULE', 'hello_celery.settings')

app = Celery('hello_celery',
    broker='amqp://',
    backned='amqp://',
    include=['demo.tasks'])
app.config_from_object('django.conf:settings', namespace='CELERY')
app.autodiscover_tasks()
This file we need to create ourselves.
Here, a Celery object is defined and through a series of optional arguments we can control what services are to
be the broker and backend for Celery.
The last two lines tell django to search within settings.py for further definitions related to individual tasks.
__init__.py
1
2
3
from __future__ import absolute_import, unicode_literals
from .celery import app as celery_app
__all__ = ['celery_app']
__init__.py files are usually empty files used by python to recognize entire directories with files as python modules. Here, however, we leverage that to inform django of the existance of Celery object instance.
tasks.py
1
2
3
4
5
6
from __future__ import absolute_import, unicode_literals
from celery import shared_task, current_task

@shared_task
def add(x, y):
    return x + y
In this file, we define just one simple task that we will soon use to test our django-celery connection.
settings.py
Finally, in settings.py we add 'django-celery-backend' to the INSTALLED_APPS to allow django
store the status of Celery tasks.
In addition, we also need to specify the mechanism, which is done by adding CELERY_RESULT_BACKEND = 'django-db' to the last line of the file.
Testing
Our Celery should now be properly integrated into our project.
Since our goal is to use Celery in the background, while keeping the application flexible, it is perhaps
a good time to test, whether this connection simply works, before moving on to something slighly more complicated.
For this reason, we will try to use the add(x, y) function defined in tasks.py to print out the result
of this operation in the terminal.
To create of a simple test, let’s make a few modifocations
to our views.py, urls.py and test.html files.
views.py
1
2
3
4
5
6
7
8
9
10
11
12
13
from django.shortcuts import render
from celery.result import AsyncResult
from .tasks import add

def index(request):
    return render(request, 'demo/index.html')

def test_page(request):
    return render(request, 'demo/test.html')

def quick_test(request):
    job = add.delay(2, 4)
    return render(request, 'demo/test.html')
Here, line #2 imports AsyncResult that allows us to
retrieve results from the asynchroneous tasks. Also, we have directly imported our function add(), which we call in line #12, but without passing its result to the front-end.
urls.py
1
2
3
4
5
6
7
8
9
10
11
from django.conf.urls import url

from . import views

app_name = 'demo'

urlpatterns= [
    url(r'^index/$', views.index, name="index"),
    url(r'^test_page/$', views.test_page, name="test_page"),
    url(r'^quick_test/$', views.quick_test, name="quick_test"),
]
As before, we must register a new URL, and (as before) we do it through hello_celery/demo/urls.py.
test.html
1
2
3
4
5
6
7
8
9
10
11
12
13
14
15
{% extends 'demo/base.html' %}
{% block title %}Celery Test{% endblock %}
{% block test_active %}active{% endblock %}

{% block body %}
<div class="row">
  <div class="col-sm-8">
    <div class="page-header">
      <h2>Watch the numbers change</h2>
    </div>
    <h3>Quick Test - Click a link and watch terminal.</h3>
    <a href="{% url "demo:quick_test" %}">Quick Test</a>
  </div>
</div>
{% endblock %}
Finally, we add a “trigger” to our template in line #12.
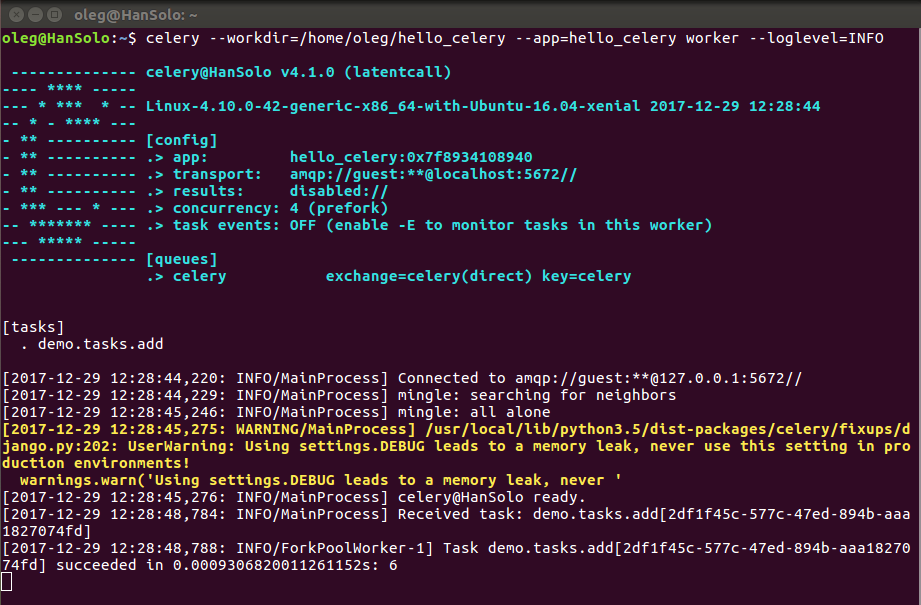
Now, to test this mechanism, we need to open a sepatate terminal window and execute the following command (ensuring virtual environment):
source ~/celery-env/bin/activate
celery --workdir=/home/youruser/hello_celery --app=hello_celery worker --loglevel=INFO
This command launches celery worker, with --workdir flag pointing it to the project’s location, and --app flag assigns the module.
Watching numbers change
Finally, we have reached the stage in where we are ready to take the tasks to the next level. We are prepared with our project to integrate our “changing numbers promise”.
Principle behind it
The principle behind it is to use tasks.py, in which we will define one more function that will increment numbers.
At each iteration, we shall put a “watch”, namely update some user-defined meta-data, making it accessible for the views.py, while keeping the task running.
Then, we will define a series of auxiliary functions (also in views.py) with corresponding URLs to manipulate the task and update the front-end.
Finally, we will suppliment test.html with a small script to poll the backend for the meta-data mentioned using AJAX, thus making it possible for to update the front-end without the necessity to relead the webpage.
The key to success is to keep track of the task id.
If take a look again at Figure 3., you should observe a long sequence of characters within demo.tasks.add[...]. This sequence is auto-generated each time we execute add.delay(...) and it is our reference to the executed task.
Defining meta-data
Let’s first define our task with customized meta-data.
tasks.py
1
2
3
4
5
6
7
8
9
10
11
12
13
14
15
16
17
18
19
20
from __future__ import absolute_import, unicode_literals
from celery import shared_task, current_task
import time

@shared_task
def add(x, y):
    return x + y

@shared_task
def increment(Limit, wait_time=0.5):
    for cnt in range(Limit):
        current_task.update_state(
                state="PROGRESS",
                meta={
                    'iteration': cnt,
                    'status': 'INCREMENTING...',
                    }
                )
        print ("Counter: {}".format(cnt))
        time.sleep(wait_time)
Function increment() is nothing, but an ordinary for loop with time delay (default is 0.5s).
Here, however, we use current_task.update_state(...) to define an auxiliary dictionary called meta for capturing progress.
Whenever the state of the task equals to 'PROGRESS', we will be able to retrieve meta for as long as we know the task ID.
As there is not limit to what we put in meta,
we take the liberty to define two fields:
'iteration'for keeping the number, and'status'to pass a custom defined information of what this number represents.
Stitching front- and back-end together
Handing the task in the back-end is a bit more complicated. To simplify, we can say, however that it boils down to handling of the four following cases:
- starting the task,
- updating the status/state of the progress,
- moving back to where we can see it, and
- aborting the task.
Each one of these cases should be handled by one particular function in views.py.
Let’s leave aborting for now.
Since we had already defined test.html to be the designated page, where the task can be tested, functions related to points (1) and (3) need to be separated.
Otherwise, moving back to the test page would spawn a new task and watching the previous one would be tricky.
Therefore, we will define (1) through a designated link.
Function (2) will be called from the front-end template using JavaScript. Function (3), which actually already exists, will be modified and (4) we will add in the end.
Before we proceed, let’s add a few imports to the views.py and remove the quick_test() functions alongside with corresponding URL.
views.py: import statements
1
2
3
4
5
6
7
8
9
10
11
12
13
14
from django.shortcuts import render, HttpResponse
from django.http import HttpResponseRedirect, JsonResponse
from django.core.urlresolvers import reverse

from celery.result import AsyncResult
from .tasks import increment

import json

def index(request):
    return render(request, 'demo/index.html')

def test_page(request):
    return render(request, 'demo/test.html')
Starting the task
The task in itself is now defined. Having the views.py prepared, we define start_test(...) function.
views.py: start_test
1
2
3
4
5
6
7
8
9
10
11
12
13
14
15
16
17
18
...
def start_test(request):
    if 'job' in request.GET:
        job_id = request.GET['job']
        job = AsyncResult(job_id)
        data = job.result
        context = {
                'check_status': 1,
                'data': "",
                'state': 'STARTING...',
                'task_id': job_id
		}
        return render(request, 'demo/test.html', context)
    else:
        job = increment.delay(120)
        print ("Celery job ID:  {}.".format(job))
        return HttpResponseRedirect(reverse('demo:start_test') + '?job=' + job.id)
...
The function works in two steps. With no prior task running (with no job_id passed through the request), it will execute our increment task in line #15, setting it to run through 120 iterations.
This will automatically define a new task, returning the reference object.
Line #17 will then redirect us back to the same page, but this time with job id appended to our URL.
Naturally, this mechanism will re-call the same function, passing this (appended) URL through GET request.
The request gets processed in lines #4-6, defining new context that will pass the job id back to the template, allowing JavaScript to take the data from there.
The only reason for defining fields in lines #8-10 is to have complete control over data populating all fields, which we will soon define in our test.html template.
urls.py: start_test
url(r'^start_test/$', views.start_test, name="start_test"),We register the corresponding URL.
test.html
1
2
3
4
5
6
7
8
9
10
11
12
13
14
{% extends 'demo/base.html' %}
{% block title %}Celery Test{% endblock %}
{% block test_active %}active{% endblock %}

{% block body %}
<div class="row">
  <div class="col-sm-8">
    <div class="page-header">
      <h2>Watch the numbers change</h2>
    </div>
    <a href="{% url 'demo:start_test' %}" role="button" class="btn btn-primary btn-lg btn-block">Start</a>
  </div>
</div>
{% endblock %}
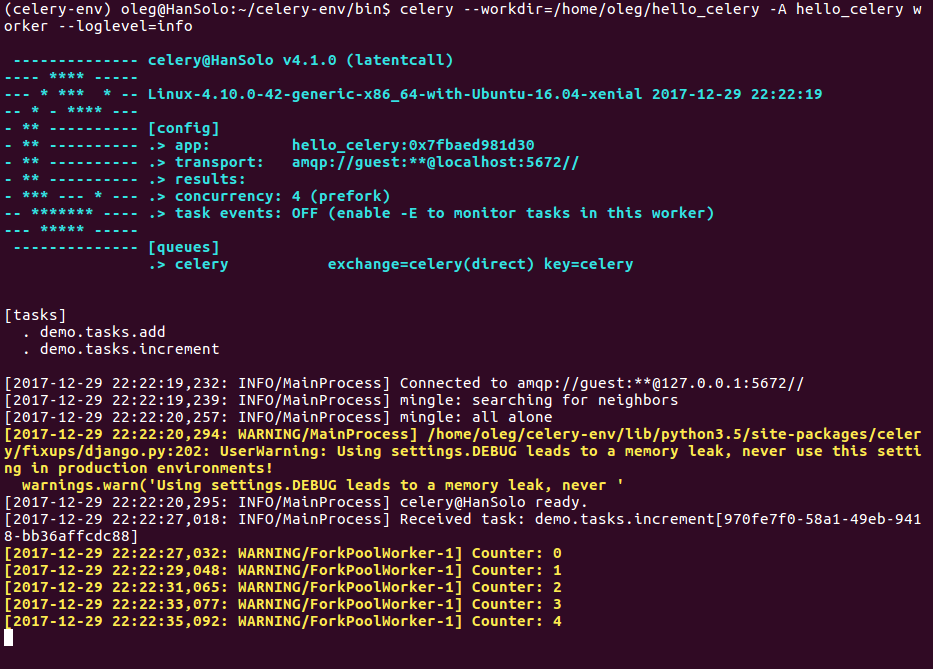
The button just created will start the celery process in the background. Although the progress tracking is not yet integrated with the front-end, the task should be observable in the terminal.
Updating task status
This is perhaps the most challenging part of the whole project, as it requires simultanous tweaking of both back-end and front-end functions. We are, however, well prepared to take on this challenge now.
Perhaps, you have noticed that our URL in the web browser has changed. It contains now the job id. If we only create a script in the front-end to call a sepatate URL containing this ID, we should be able to check for the task status - all the things we have defined as meta-data. This time, let’s first start with the front-end.
test.html
1
2
3
4
5
6
7
8
9
10
11
12
13
14
15
16
17
18
19
20
21
22
23
24
25
26
27
28
29
30
31
32
33
34
35
36
37
38
39
40
41
42
43
44
45
46
47
48
49
50
51
52
53
54
{% extends 'demo/base.html' %}
{% block title %}Celery Test{% endblock %}
{% block test_active %}active{% endblock %}

{% block body %}
<div class="row">
  <div class="col-sm-8">
    <div class="page-header">
      <h2>Watch the numbers change</h2>
    </div>
    <a href="{% url 'demo:start_test' %}" role="button" class="btn btn-primary btn-lg btn-block">Start</a>

    <h3>Look under the process though JSON.</h3>
    <label>Data:</label><br>
    <input id="data-field" value="{{ data }}" size="64">
    <br>
    <label>State:</label><br>
    <input id="state-field" value="{{ state }}" size="64">
    <br>
    <h3>From Django-Celery-Result DB.</h3>
    <label>Status:</label><br>
    <input id="status-field" value="{{ status }}" size="64">
    <br>
    <label>Job ID:</label><br>
    <input id="job-field" value="{{ task_id }}" size="64">
  </div>
</div>

<script type="text/javascript">
var poll_xhr;
var checkStatus = {{ check_status }};

update = function(){
    var task_id = "{{ task_id }}";
    var state   = "{{ state }}";
    poll_xhr = $.ajax({
        url: 'update_status/?task_id={{ task_id }}',
        type: 'GET',
        success: function(result){
            console.log(result);
            $('#data-field').val(result.iter);
            $('#state-field').val(result.state);
            $('#status-field').val(result.status);
        }
    });
}

if (checkStatus){
  setInterval(function(){update();}, 200);
}else{
  clearInterval(function(){update();});
}
</script>
{% endblock %}
The template has been expanded considerably. Let’s analyze is a bit.
Lines #14-25 define fields, where we can watch the changes, with data, state, status and task_id being field values that are passed to the template using liquid syntax that we have already used before.
The fields have been categorized on purpose.
The first two will directly reflect our definition of the meta-data, while the latter two are refered more to the Celery backend.
Indeed, Celery has its own convention on naming particular states.
Looking back on views.py, we do not define 'status' on purpose.
If not yet defined, Celery has no way of knowing of its status, has it?
From line #29, we begin with JavaScript (and jQuery).
Function update() is the essence.
Using $.ajax it requests the back-end’s URL for a particular function associated with update_status, appending the task id through GET method.
Assuming successful response, it enforces updating the fields’ values with corresponding back-end data.
More information on AJAX APIs can be found here.
Finally, lines #47-51 “activate” the update() function based on an interval of 200ms and force it to stop depending on the check_status obtained from the back-end.
Knowing that the $.ajax method expects a JSON-like format from the back-end, while calling it at a particular URL via GET, we can move on to views.py.
views.py: update_status
1
2
3
4
5
6
7
8
9
10
11
12
13
14
15
16
17
18
19
20
21
22
23
24
25
...
def update_status(request):
    print ("Update on: {}.".format(request.GET))
    if 'task_id' in request.GET.keys():
        task_id = request.GET['task_id']
        task = AsyncResult(task_id)
        result = task.result
        status = task.status
    else:
        status = 'UNDEFINED!'
        result = 'UNDEFINED!'
    try:
        json_data = {
            'status': status,
            'state': result['status'],
            'iter' : result['iteration']
            }
    except TypeError:
        json_data = {
            'status': status,
            'state': 'FINISHED',
            'iter' : -1
            }
    return JsonResponse(json_data)
...
Again, let’s break it down.
Lines #4-8 (in this snippet) obtain the task status and result, retrieved from AJAX request via GET.
In case of the task being undefined, asking either will cause an error.
Later, in lines #12-17, we define a dictionary (JSON) using both Celery task status and our own meta-data.
Once the task is finished, our meta-data will no longer be available, causing TypeError.
Since not passing it at all will cause errors for the JavaScript, we define some dummy data.
Finally, we let the function respond through JSON as required by our JavaScript.
Last, but not least, we register another URL.
urls.py: update_status
url(r'^[\s\S]*/update_status/$', views.update_status, name='update_status'),Here ^[\s\S]*/ will allow the back-end to recognize the regular expression irrespectively of what other sequence stands before it.
For example, if the task has been triggered using the button, the corresponding AJAX request URL will read as /start_page/update_status/?task_id=....
We require, however, to be also able to track the progress after for example clicking on index page and then going back to test.
In this case, the request will read as /test_page/update_status/?task_id=....
Possibility to come back
Right now, we loose track of the processed task when moving away and back to the test page.
To keep it, we need to have a mechanism of storing the ID somewhere.
A database would be a good idea.
Fortunately, Celery integrates well with Django, making it possible to retrieve any processed task ID using django_celery_results.models.
All we need to do, is to add one more import statement in views.py.
from django_celery_results.models import TaskResultFurthermore, we need to modify the test_page(...) function.
views.py: test_page (modified)
1
2
3
4
5
6
7
8
9
10
11
...
def test_page(request):
    try:
        currentProcess = TaskResult.objects.last()
        if currentProcess.status == 'PROGRESS':
            return HttpResponseRedirect(reverse('demo:start_test') + '?job=' + currentProcess.task_id)
        else:
            return render(request, 'demo/test.html')
    except:
        return render(request, 'demo/test.html')
...
In this application, we are only interested in the last task.
The try/except statements are needed in case no tasks exists within the database.
If this is so, the TaskResult.objects.last() would return an empty object.
Line #6 reuses the same mechanism of redirecting that we had used earlier.
In case the task is finished, no progress tracking is needed anyomre, hence we can just render the test.html template as before.
Check it out. Now, you should be able to move across the pages and for as long as the task is being processed, you should be able to track its progress.
One more thing, with TaskResult, we are able to perform operations on tasks just like on any other django models.
An interesting thing happens when we look into the admin panel, but we leave it as a bonus for the reader.
Aborting the task
The last thing remaining is a possibility to revoke a task, while it is being processed. This is a natural thing to have, especially if Celery queues are full of lengthy tasks, and under “normal” circumstances they will.
Comparing to what we just achieved, this is an easy thing.
Before proceeding, we need to add one more import to views.py.
from hello_celery.celery import appThen, it is a usual procedure of adding a function to views.py, registering URL and adding a trigger to the template.
views.py: abort_task
1
2
3
4
5
6
7
8
9
10
...
def abort_test(request):
    try:
        currentProcess = TaskResult.objects.last()
        task_id = currentProcess.task_id
        app.control.revoke(task_id, terminate=True)
        return HttpResponseRedirect(reverse('demo:start_test') + '?job=' + task_id)
    except:
        return HttpResponseRedirect(reverse('demo:start_test'))
...
With this snippet being rather intuitive, it is perhaps worth to mention that revoking a task, as perfomed in line #6, forces the application to unconditionally terminate a task. This is a pretty “burtal” mechanism. Therefore, it must be used with caution, or even not used if the task performs some critical functions, which could compromise the application is data is lost.
Once done, we register a new URL in urls.py.
url(r'^abort_test/$', views.abort_test, name="abort_test"),Finally, we add one more line to our test.html template. Here, it will be a new link-button, just under the Start button.
<a href="{% url 'demo:abort_test' %}" role="button" class="btn btn-danger btn-lg btn-block">Abort</a>Final steps
We have made it! The application is now finished, featuring all functionality we promised.
As the last steps, there are two more things that we should do before proceeding with the demployment. Mainly, it makes sense to record all of package dependencies. Indeed, once we move on to the next machine, we will be required to re-create all the environment so that our project runs smoothly.
A standard practice to do it in python is to freeze all installations we have made using pip and save them to a special file. Assuming we operate within virtual environment, this is what we do:
cd ~/hello_celery
pip freeze > requirements.txt
For the sake of reference
The requirements.txt for our project should read:
amqp==2.2.2
anyjson==0.3.3
billiard==3.5.0.3
celery==4.1.0
Django==1.11.7
django-celery-results==1.0.1
kombu==4.1.0
pkg-resources==0.0.0
PyMySQL==0.8.0
pytz==2017.3
SQLAlchemy==1.1.15
vine==1.1.4
Again, it makes perfect sense to keep this file revisioned through git alongside with the rest of the project.
Also, just for the sake of reference, the project file structure should read:
hello_celery/
├── db.sqlite3
├── demo
│   ├── admin.py
│   ├── apps.py
│   ├── __init__.py
│   ├── migrations
│   │   ├── __init__.py
│   │   └── __pycache__
│   │       └── ...
│   ├── models.py
│   ├── __pycache__
│   │   └── ...
│   ├── tasks.py
│   ├── templates
│   │   └── demo
│   │       ├── base.html
│   │       ├── index.html
│   │       └── test.html
│   ├── tests.py
│   ├── urls.py
│   └── views.py
├── hello_celery
│   ├── celery.py
│   ├── __init__.py
│   ├── __pycache__
│   │   └── ...
│   ├── settings.py
│   ├── urls.py
│   └── wsgi.py
├── manage.py
└── requirements.txt
If you wish, you can use the finished code on github and move on to part III, which discusses deployment.