Hosting private pip packages using Azure Artifacts
Introduction
Imagine a typical situation, in which you build some production ready data pipeline that requires several levels of data processing. The ways you process the data is subjugated to constant evolution as it relies on output from research carried by you or another team. Things are expected to change as experimentation is an ongoing. Naturally, the last thing you want is to blend “operations” logic with “scientific” code.
How can you solve the problem, especially if the scientific part is well… private?
One way to safely “marry” the code is to package the scientific part and make it integrable with the rest as a pip package. For safety reasons, you need to find a way to host it privately.
In this post, we discuss how to organize your python code as private pip installable package with Azure Artifacts and to integrate it using standard python virtual environment.
Packaging python project
Packaging of a python project is a fairly simple task. Here, we will list only the key steps that must be followed for it work.
Project structure
Despite research code is subjugated to changes, the following structure needs to be implemented:
.gitignore          # exclude virtual environments, build/ and dist/ directories
README.md
requirements.txt    # list of all dependencies
setup.py            # containing description and version, a must-have
yourproject/        # main module for data processing
    __init__.py
    ...             # all content, files, classes, functions, etc.
The file yourproject/__init__.py, needs to have the following line in it:
1
name = "yourproject"
Create virtual environment and install dependencies
$ python3 -m venv env
$ source env/bin/activate
(env) $ pip install -r requirements.txt
To deactivate the virtual environment, execute:
(env) $ deactivateSo far, it is nothing out of the standard. Installation of regular dependencies is done by invoking the following command from under the virtual environment.
$ pip install <package>==<package version>
$ pip freeze > requirements.txt
Define your setup.py file
The setup.py file should reflect the content of your package.
1
2
3
4
5
6
7
8
9
10
11
12
13
14
15
16
17
18
19
20
21
import setuptools

with open("README.md", "r") as fh:
    long_description = fh.read()

setuptools.setup(
    name="yourproject",
    version="0.0.1",
    author="You",
    author_email="you@youremail.com",
    description="That's what my project should do.",
    long_description=long_description,
    long_description_content_type="text/markdown",
    url="https://github.com/you/yourproject",
    packages=setuptools.find_packages(),
    classifiers=[
        "Programming Language :: Python :: 3",
        "License :: OSI Approved :: MIT License",
        "Operating System :: OS Independent",
    ],
)
Generate the package
Now, here is an exception related to the standard way of doing it. Normally, you would build the package using:
(env) $ python -m pip install --user --upgrade setuptools
(env) $ python setup.py sdist bdist_wheel
And upload it:
(env) $ python -m pip install --user --upgrade twine
(env) $ python -m twine upload --repository-url https://test.pypi.org/legacy/ dist/*
You will not do it, however. Since you do not want your package to be end up in a public host, you should need to follow Azure specific steps below.
Hosting with Azure Artifacts
The good thing with Azure Artifacts is that it can now host python packages in a private mode. The bad thing, however, is that it can only currently do so in a so-called preview mode. The preview mode means that the stuff works, but… sometimes not quite completely.
Following the official Azure documentation guides you through the steps. Unfortunately, when pulling of the package from the Azure host, the server returned error 400. Any attempt to install the package fails.
(env-test) me@mypc:~/funprojects/env-test$ pip install yourpackage==0.0.1
Looking in indexes: https://mypipline:****@pkgs.dev.azure.com/organization/_packaging/mypipline/pypi/simple/
Collecting yourpackage==0.0.1
Could not find a version that satisfies the requirement yourpackage==0.0.1 (from versions: )
No matching distribution found for yourpackage==0.0.1
(env-test) me@mypc:~/funprojects/env-test
Although the package was found in Azure Portal, it somehow could not be downloadad.
The problem can be solved with building of a continuous integration pipeline using Azure DevOps tool. Setting up of CI is beyond the scope of this post, although you can take a look at this article (by Microsoft) Here, we list only the neccessary settings for it to work.
Configuring CI for your project
The prerequisite for this step is that you (obviously) have an Azure account, and purchase Azure Artifacts add-on.
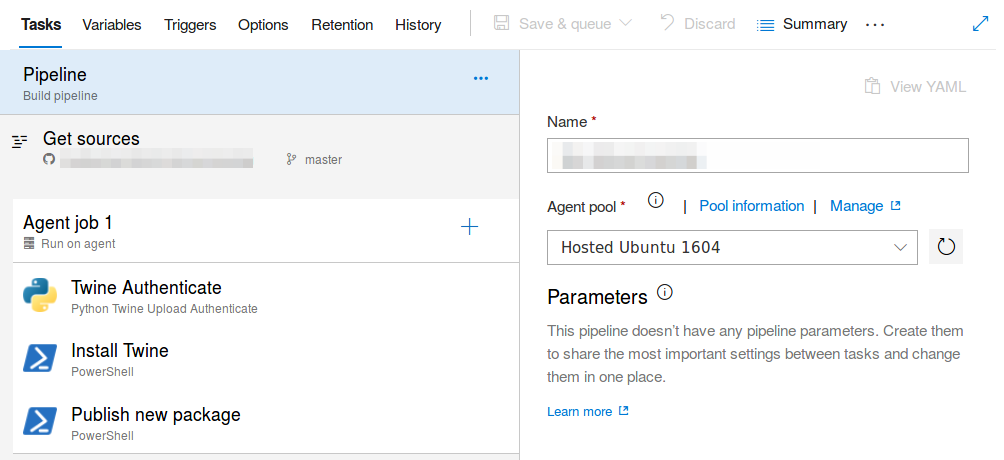
Once you are set, there are four essential elements that must be defined in your CI pipeline for it to work:
- The Get source part needs to point to your repository (e.g. Github) and define the source branch.
- Twine Authenticate needs to be enabled and point to your pipeline feed.
- Install Twine needs to contain
python -m pip install twine --userin the script field. - Finally, Publish new package needs to contain the following script:
python setup.py sdist
python -m twine upload -r <your-pipeline-name> --config-file
$(PYPIRC_PATH) dist/*
This configuration will build your package whenever certain action is triggered.
This could be, for example, merging your code with the master branch or committing to it directly.
For this reason, you can ignore the standard instruction given by the official documentation telling you to configure your local .pypirc file
and building and uploading your package.
Now, this part is sorted through continuous integration mechanism.
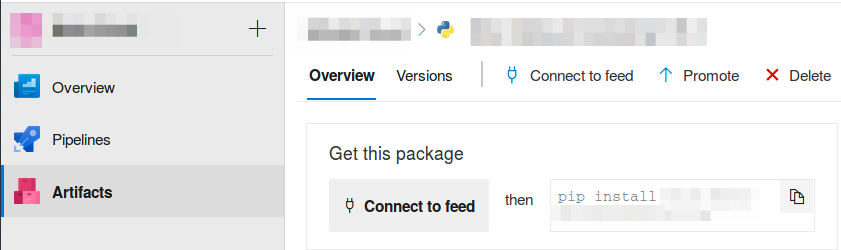
Get your package
Now, you are working on a differenet part - the operation part. It is a different repository and a separate virtual environment, which you would create using the exact same procedures as described at the beginning of this post. This is also the point, where you can go back to the official documentation, which tells you to perform the next step. Still, there is one last hack you need to do…
Assuming you have connected to your feed under Artifact and generated of a new virtual environment,
you need to create a pip.conf (or pip.ini) file in your venv, using Generate Python credentials option.
This file should tell your venv that your custom host exists and allow you to authenticate using of an access token.
pip.conf
[global]
index-url=https://yourpipeline:****@pkgs.dev.azure.com/yourorganization/_packaging/yourpipeline/pypi/simple/
The problem with the generated content of this file is that the index-url line will prevent your environment from accessing
other public hosts for packages!
In other worlds, your project will be limited to pip-installing and importing of the very package you have created.
Therefore, the last step is for you to change index-url to something different, such as extra-index-url.
This is the last trick, which will surely do the job.
Next steps
Now, you are all set. You can create of a new project and its corresponding vritual environment and the following command will work:
(env-new) $ pip install yourpackage
(env-new) $ pip install numpy
...
(env-new) % pip freeze > requirements.txt
So will statements like:
1
2
3
import numpy as np
from yourpackage.yourfile import yourclass, yourfunction
...
Good luck with creating your private pip packages!