
Django and Celery - demo application, part I: building.
Introduction
While Django is one of the most popular web-development frameworks available for python language, as any application is may at some point grow in size and reach a stage, when a simple request-reponse strategy no longer remains sufficient. Celery has been known for offering a great flexibility when it comes to asynchroneous task scheduling, making it possible to process key tasks in the background, leaving the main application quick and responsive.
In this series of three posts:
we are going to build a simple application that demonstrates how Django and Celery can be used together for monitoring progress of a task, with incrementing of a counter given as an exmaple. Naturally, such task can be replaced with any other, perhaps more elaborate one, allowing to construct more sophisticated front-end monitoring systems. In addition, we will make it the way a user can retain freedom to move across the application without loosing track of its progress and abort it if necessary.
For consistency reasons, we will begin with creating of a Django project from scratch. This way, we will ensure that all dependencies and paths are correctly resolved for the sake of this work. This post can hence be considered as optional. However, if you are new to either Django or Celery (or both!), it is recommened that you take a look at it first. Otherwise, you may proceed to part II directly. In case you would like to focus on deployment (part III), it shows how to use this project in production environment, featuring:
- Gunicorn for running of the application,
- Supervisor for monitoring of the process,
- Nginx as a proxy server,
- RabbitMQ as a message broker between Django and Celery,
and all that using Ubuntu operating system.
You can also use the finished work on github.
Creating the project
Before proceeding with the actual work, let us first define a virtual environment for the application to ensure that all packages are installed in a systematic manner. The name and place (path) to the virtual environment directory is arbitrary, but we will call it celery-env here and define it directly in our home folder.
cd ~
python3 -m venv celery-env
It will allow us to install all the packages using pip. If you don’t have pip, have a look here (pip) and here (venv).
Next, we must activate the environment using:
source ~/celery-env/bin/activateAn immediate sign of success is our prompt being prefixed with (celery-env), where simple python --version command should output Python 3.5.x, instead of e.g. 2.7.
To deactivate the environment, just type deactivate.
Once activated, we use pip (not pip3) to install the relevant packages:
pip install django==1.11.7The project can be initialized in the following way:
cd ~
mkdir hello_celery
django-admin.py startproject hello_celery ~/hello_celery
The project is localized under /home/username/hello_celery/..., which we will call
project root directory. Again, the exact location and name is arbitrary for as long as we are consistent.
Basic project configuration
In order to run, we need to specify a few things.
First of all, we need to add a list of domains and/or IP numbers to the ALLOWED_HOSTS, inside
hello_celery/hello_celery/settings.py. For development purposes, it is enough that we add
'127.0.0.1', to run the project on the local machine.
Next, we should define STATIC_ROOT = os.path.join(BASE_DIR, 'static/') to be the last line
in the same settings.py file, allowing django to collect static files when in “production”.
Dry run
Before running, we need to perform database migration. This step we will frequently repeat, as soon as we modify of the application.
cd ~/hello_celery
./manage.py makemigrations
./manage.py migrate
Note that being able to execute the commands using ./manage.py rather than python3 manage.py is a consequence of having activated virtual environment (as required).
Another thing is defining a project’s superuser, making it possible to access admin panel through
http://127.0.0.1:8000/admin.
./manage.py createsuperuserFinally, we can test our settings using runserver command.
./manage.py runserverIt will run django development server using 127.0.0.1:8000, unless specified differently.
Building the application
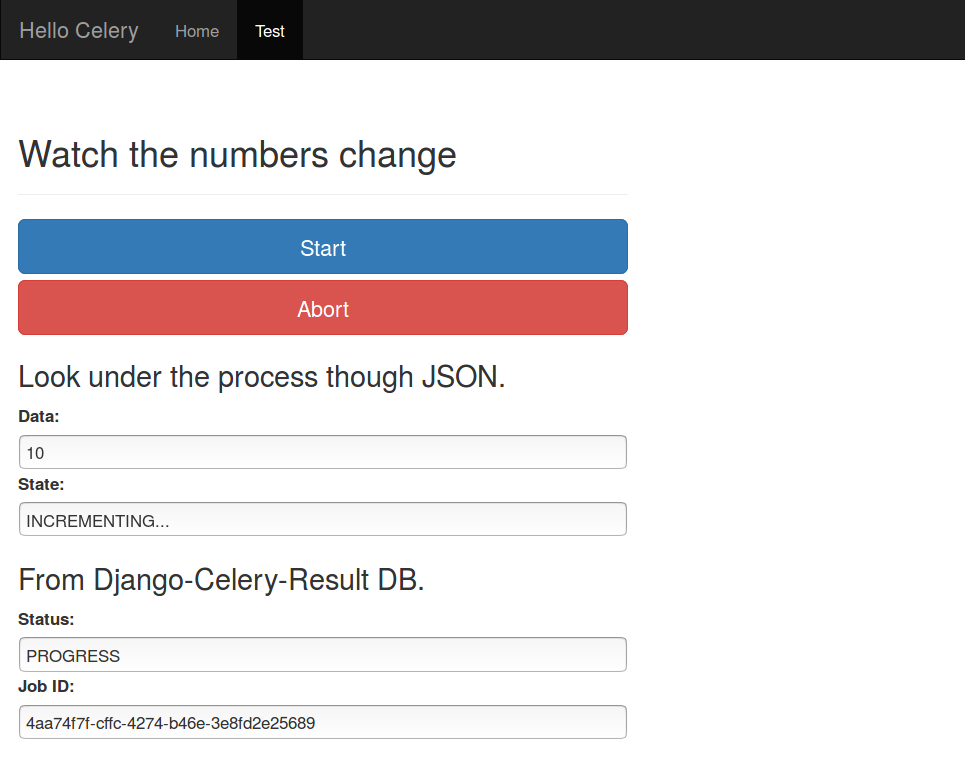
Now that we have the basics set up, we can begin with constructing of the actual application. As mentioned earlier, we will define a very basic task of incrementing a counter and display changing numbers in the front-end, with possibility to abort the task at any given time and freedom to move across the application without loosing track of its progress.
Organizing the project
Here, the word “application” refers to django-specific concept of one or more separated services that belong to a project. Within our hello_celery project, we will define just one application and call it demo, for simplicity. Assuming, we still operate under virtual environment, we create the application using:
./manage.py startapp demoThe application itself is operated using URLs that must be registered in urls.py files and
defined in views.py. Most of our URLs will be specific to demo, which makes sense to register
them under hello_celery/demo/urls.py. However, in order for them to be recognized within the
whole project, we need to include them in the hello_celery/hello_celery/urls.py file.
This file should look the following:
1
2
3
4
5
6
7
from django.conf.urls import url, include
from django.contrib import admin

urlpatterns = [
    url(r'^admin/', admin.site.urls),
    url(r'^', include('demo.urls')),
]
Note that the regular expression: r'^' will result in URL definitions of demo being directly
‘attached’ to the site domain name or IP address (e.g. http://localhost:8000/start).
Although not the best practice, it should simplify the demonstration.
Line #6 includes all the defninition from hello_celery/demo/urls.py, and this is exactly, where
we are going to register them.
The file is not automatically generated. We need to create it first. Let’s do it and type in the following content:
1
2
3
4
5
6
7
from django.conf.urls import url
from . import views

app_name = 'demo'

urlpatterns = [
]
In this file, we will soon define URL patterns for manipulating of the application.
Finally, we must register this application in the main settings.py file.
We do this by adding 'demo' to the INSTALLED_APPS in this file.
Adding html templates
As templates are usually specific to an applicaiton, their exact form is of less importance to the project. Here, we will define just two pages:
- test.html for demonstrating of functionality of Celery, and
- index.html to simulate the “rest” of the application.
In addition, we will include base.html with common content, such as navigation bar, and add basic Bootstrap theme to improve the visual quality. To integrate templates, let’s create the following directories and files:
cd ~/hello_celery/demo
mkdir templates
cd templates
mkdir demo
Then, under hello_celery/demo/templates/demo, will define the three .html files, with the following content:
base.html
1
2
3
4
5
6
7
8
9
10
11
12
13
14
15
16
17
18
19
20
21
22
23
24
25
26
27
28
29
30
31
32
33
 <!DOCTYPE html>
<html lang="en">
<head>
  <title>{% block title %}Hello Celery{% endblock %}</title>
  <meta charset="utf-8">
  <meta name="viewport" content="width=device-width, initial-scale=1">
  <link rel="stylesheet" href="https://maxcdn.bootstrapcdn.com/bootstrap/3.3.7/css/bootstrap.min.css">
  <script src="https://ajax.googleapis.com/ajax/libs/jquery/3.2.0/jquery.min.js"></script>
  <script src="https://maxcdn.bootstrapcdn.com/bootstrap/3.3.7/js/bootstrap.min.js"></script>
</head>
<body>

<nav class="navbar navbar-inverse" style="border-radius: 0px;">
  <div class="container-fluid">
    <div class="navbar-header">
      <a class="navbar-brand" href="#">Hello Celery</a>
    </div>
    <ul class="nav navbar-nav">
      <li class="{% block home_active %}{% endblock %}">
	<a href="{% url 'demo:index' %}">Home</a></li>
      <li class="{% block test_active %}{% endblock %}">
	<a href="{% url 'demo:test_page' %}">Test</a></li>
    </ul>
  </div>
</nav>

<div class="container-fluid">
  {% block body %}
  {% endblock %}
</div>

</body>
</html>
index.html
1
2
3
4
5
6
7
8
9
10
11
12
13
14
15
{% extends 'demo/base.html' %}
{% block title %}Home{% endblock %}
{% block home_active %}active{% endblock %}

{% block body %}
<div class="row">
  <div class="col-sm-12">
    <div class="page-header">
      <h2>Welcome to Celery Demo</h2>
    </div>
    <h3>This little thing is to test django-celery configuration.</h3>
    <p>by Oleg Żero</p>
  </div>
</div>
{% endblock %}
test.html
1
2
3
4
5
6
7
8
9
10
11
12
13
{% extends 'demo/base.html' %}
{% block title %}Celery Test{% endblock %}
{% block test_active %}active{% endblock %}

{% block body %}
<div class="row">
  <div class="col-sm-8">
    <div class="page-header">
      <h2>Watch the numbers change.</h2>
    </div>
  </div>
</div>
{% endblock %}
Making navigation work
The templates are more or less defined. Before we proceed with integrating Celery into the applicaiton, we should make sure that the basic navigation between pages works fine. For that, we should define two URLs that will allow us to switch between the pages.
Let’s begin with defining the respective functions under hello_celery/demo/views.py.
views.py
1
2
3
4
5
6
7
from django.shortcuts import render

def index(request):
    return render(request, 'demo/index.html')

def test_page(request):
    return render(request, 'demo/test.html')
Then, in hello_celery/demo/urls.py (we will simply refer to it as urls.py from now on), we define two respective
URL patterns:
urls.py
url(r'^index/$', views.index, name="index"),
url(r'^test_page/$', views.test_page, name="test_page"),
Ready to move on
Now that you should be able to move between the pages without problems, it is time to take a step into integrating Celery into the application - part II.