Eye o'Spy
External Access
So far we have everything we need to perform a successful motion detection, watch the stream online as well as to manipulate with the Raspberry externally. In this part, however, we will do a little bit of cosmetics in order to facilitate working with the camera externally. Until now, in order to activate or deactivate the program, we needed to log in to the Raspberry and invoke the specific command. Now, we will use Python in order to access Motion more easily.
The point is to create two python scripts to act as server and
the client, hence making a tiny abstraction layer for to
handle the connection. The scripts will talk to each other, in a way
that ssh‘ing will be avoided. You can think of it as a
starting point for expansion, if you’d like to, for example, enable
other members of your family to use the system through an application.
In this simple version, we will use the two modules in both scripts:
socket- for the TCP/IP connection.os- for letting Python "type" the terminal commands for us.
Let’s start with the server part.
Server Side
The server.py is obviously going to be deployed on the
Raspberry. Its task will be to listen for connection and depending on
incoming command from the client, it will start or stop Motion. Before
we begin, however, let us use cron scheduler in order to
ensure that this script is executed every single time Raspberry
reboots.
In Raspberry’s terminal execute:
sudo crontab -eand select your favourite text editor, when prompted to.
Next, add the following line to the file:
@reboot python /home/USER/PATHTOFILE/server.py &The capital letters should, of course, be adapted to your case and the & sign is used to free the terminal.
Now, the body of the script:
server.py
1
2
3
4
5
6
7
8
9
10
11
12
13
14
15
16
17
18
19
20
21
22
23
24
25
26
27
28
29
30
31
32
33
34
35
36
37
38
39
40
41
42
import socket
import sys
import os

PORT = 8000

server_socket = socket.socket(socket.AF_INET, socket.SOCK_STREAM)
server_socket.bind(("", PORT))
server_socket.listen(5)

print ("TCPServer Waiting for client on port " + str(PORT) + ".")

while True:
    client_socket, address = server_socket.accept()
    print("Client connected from " + str(address) + ".")
    while True:
        data = client_socket.recv(2048)
        if (data == 'q' or data == 'Q'):
            client_socket.close()
            print("Client disconnected.")
            break;
        else:
            print("RECEIVED: " + data + ".")
        if data == 'start':
            os.system("sudo motion start")
            client_socket.send("ON")
        if data == 'stop':
            os.system("sudo pkill motion")
            client_socket.send("OFF")
            if data == 'check':
                response = os.popen("pgrep motion").read()
                if response == '':
                    print("Camera is INACTIVE.")
                    client_socket.send("OFF")
                else:
                    print("Camera is ACTIVE.")
                    client_socket.send("ON")
        if not(data in ["start", "stop", "check"]):
            client_socket.send("Wrong command!")
            client_socket.close()
            print("Client disconnected.")
            break
I guess, you can deduct from the code that after the connection is
made, the server waits for the client and responds to keywords. The os.system()
function is used to manipulate with Motion as if we did it through the
terminal and client_socket.send() transfers the commands
between the devices.
Client Side
The client.py is to be deployed on a PC (or mobile
device) that is used to connect to the camera. The body of the file is
the following:
client.py
1
2
3
4
5
6
7
8
9
10
11
12
13
14
15
16
17
18
19
20
21
22
23
24
import socket
import sys

PORT = 8000

client_socket = socket.socket(socket.AF_INET, socket.SOCK_STREAM)
client_socket.connect(("www.YOURDOMAIN.net", PORT))
while True:
    data = raw_input("S<-: ")
    if (data == 'Q' or data == 'q'):
        print("C->: Program is closing, disconnecting client.")
        client_socket.close()
        sys.exit()
    if (data == 'H' or data == 'h'):
        print("Little help guide:")
        print(" 'q/Q' for quit")
        print(" 'h/H' for help")
        print(" 'start' for activating the camera")
        print(" 'stop' for deactivating it")
        print(" 'check' for checking of the status")
    else:
        client_socket.send(data)
        data = client_socket.recv(2048)
        print("S >: Camera is " + data + ".")
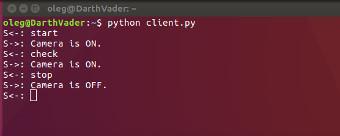
Demonstration
Remark on Security…
Truth is… anyone can easily hack this system. In fact, it doesn’t even need to be hacked. It uses no security whatsoever!
Therefore, for the actual implementation it is absolutely essential to use tokenization and encription.
For that, however, it is much better to replace the server.py and client.py scripts
with some more professional web development framework such as Flask or Django.
This, at the time of writing, was beyond the scope of this project.